This is a how to Create and Configure Bridge Networking For KVM in RHEL, CentOS 7.x, CentOS 6.x,Ubuntu 15.04, Ubuntu 14.04,Debian 8 Jessie, Debian Wheezy and all other Debian Derivatives.
We have different ways to configure Networking in KVM; to allow Virtual Machines to Access external network.The default network used by a Virtual Machine launched in KVM is NAT network.With NAT networking, virtual network is created for the guest machines which is then mapped to host network to provide network external connectivity.
When you configure and use Bridged networking, guest operating systems access external network connected directly to the host machine.
Bridged networking is also referred to as physical device sharing and it dedicates a physical device to a virtual machine.
Bridge can be created either using Virt-Manager,using virsh command line tool,directly editing network scripts or using Linux Network management tools.
hotplug - This will activate the bridge even if the guest virtual machine is running
onboot -With this, the bridge is activated on the next guest virtual machine reboot
![]()
![]()
Restart your network daemon.
If you would like to totally disable NetworkManager, do:
Tags:
How to configure KVM Bridging interface in Linux
Get Linux Bridge working
Create, configure and make KVM Network bridge functional
KVM and Bridging on CentOS Linux
We have different ways to configure Networking in KVM; to allow Virtual Machines to Access external network.The default network used by a Virtual Machine launched in KVM is NAT network.With NAT networking, virtual network is created for the guest machines which is then mapped to host network to provide network external connectivity.
When you configure and use Bridged networking, guest operating systems access external network connected directly to the host machine.
Bridged networking is also referred to as physical device sharing and it dedicates a physical device to a virtual machine.
Bridge can be created either using Virt-Manager,using virsh command line tool,directly editing network scripts or using Linux Network management tools.
Method 1: Creating Bridge Network using Virtual Machine Manager.
- Open Virtual Machine Manager,
- Go to Edit > Connection Details > Network Interfaces
- Configure a new network interface by clicking the + at the bottom of the window.
- Make sure interface type is set to "bridge"
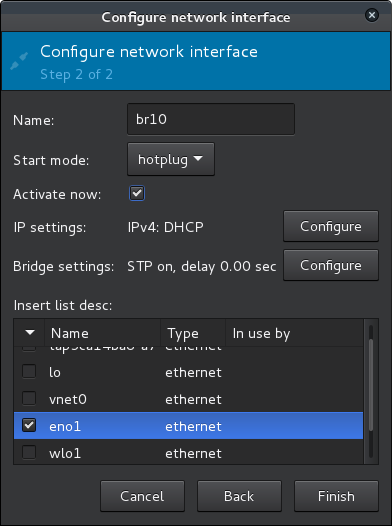
- Click Forward button, on next window, set name of the bridge,start mode and whether to activate immediately.The following are start modes can be used after creating bridge network:
hotplug - This will activate the bridge even if the guest virtual machine is running
onboot -With this, the bridge is activated on the next guest virtual machine reboot
- Choose the interface you are bridging and finish setting up.

Method 2 : Create a bridge based on the an interface using command line ( Universal):
For example, to create a bridge name br10 based on eno1 interface, we would enter:virsh iface-bridge eno1 br10
Method 3: Create a bridge by editing network script (CentOS / RHEL):
Below script will create a bridge called br10,vi /etc/sysconfig/network-scripts/ifcfg-br10Enter contents below:
The configuration of eno1 interface that i'm bridging to will be:DEVICE=br10
STP=no
TYPE=Bridge
BOOTPROTO=none
DEFROUTE=yes
IPV4_FAILURE_FATAL=yes
IPV4_ROUTE_METRIC=99
IPV6INIT=yes
IPV6_AUTOCONF=no
IPV6_DEFROUTE=yes
IPV6_FAILURE_FATAL=no
IPV6_ROUTE_METRIC=1024
NAME=br10
ONBOOT=yes
DNS1=8.8.8.8
DNS2=192.168.1.1
IPADDR=192.168.1.10
PREFIX=24
GATEWAY=192.168.1.1
IPV6_PRIVACY=no
MACADDR= XX:XX:XX:XX:XX:XX
# root at controller in ~ [23:56:58]If your network uses MAC filtering, you can add the mac address of interface allowed to access internet by MAC address filter.Replace XX:XX:XX:XX:XX:XXwith correct mac address.
→ cat /etc/sysconfig/network-scripts/ifcfg-eno1
DEVICE=eno1
TYPE=Ethernet
ONBOOT=yes
BRIDGE=br10
Restart your network daemon.
systemctl restart network.serviceSince NetworkManager does not support bridging, it has to be disabled in order to use network scripts located in /etc/sysconfig/network-scripts/ directory.If you don't want to completely disable NetworkManager, add "NM_CONTROLLED=no" to the network script used for bridging link.
If you would like to totally disable NetworkManager, do:
# systemctl disable NetworkManager
# systemctl enable network
# systemctl stop NetworkManager
# systemctl start network
Method 4: Using Nmcli tool ( Work on Debian 8, CentOS 7.X,RHEL 7.x)
nmcli connection add type bridge autoconnect yes con-name br10 ifname br10Stop and restart both Network manager and Networking:
nmcli connection modify br10 ipv4.addresses 192.168.1.10/24 ipv4.method manual
nmcli connection modify br10 ipv4.gateway 192.168.1.1
nmcli connection modify br10 ipv4.dns 192.168.1.1
systemctl stop NetworkManager
systemctl stop network
systemctl start NetworkManager
systemctl stop network
Method 5: Editing Network Script file ( All Ubuntu systems, Debian derivatives like Kali Linux, Linux Mint, Xubuntu,Kubuntu e.t.c.)
Configure Bridging interface:cat >> /etc/network/interfaces<< EOFDisable all lines on eth0 interface section to look something like below:
auto br10
iface br10 inet static
address 192.168.1.10
network 192.168.1.1
netmask 255.255.255.0
broadcast 192.168.1.255
gateway 192.168.1.1
dns-nameservers 192.168.1.1
bridge_ports eth0
bridge_stp off
EOF
auto eth0You should now have a working Bridge network interface added.
iface eth0 inet manual
Tags:
How to configure KVM Bridging interface in Linux
Get Linux Bridge working
Create, configure and make KVM Network bridge functional
KVM and Bridging on CentOS Linux