After successfully Installing Asterisk PBX server and Installing Openfire XMPP Chat server, it's time to integrate the two so that our Chat server can be used within the VOIP infrastructure build with Asterisk.
Prerequisites
Installation of Openfire XMPP Chat Server:
Complete guide on how Install Openfire XMPP chat server on Centos 7
Installation of Asterisk PBX:
How to install Asterisk PBX 13.x on CentOS 7 step by step guide
> Under Asterisk-IM > General settings, make sure Asteris-IM plugin is enabled.
On "Configure Phone Manager", add Asterisk Context, mine is named test.If you have context already configured in your Asterisk Server, add it here. In case you don't have any context, use "test" as we'll add it later.
![]()
> Now it's time to add Asterisk Server. This is done by just clicking on "Add Server" option under General settings.Then provide the following information
Server Name:Alias name of your Asterisk Server. Can be any name
Server IP: Ip address of your Asterisk Server
Port: connection port used to connect to Asterisk Server, default is 5038
Username: user name that will connect to the asterisk manager. We'll add it to Asterisk manager.conf file in the next step.Save the configurations.
Password: user password that will be used to connect to Asterisk PBX server.
See screenshot below for my configuration.
![]()
![]()
![]()
You can now install Sparkweb which is an Open Source, web-based IM client optimized for businesses and organizations and Spark IM client to use. You will be able to receive a call via SIP account we added to Asterisk.
On our next tutorial, we'll talk about how to Use Zoiper and X-Lite Softphones to send instant messages over Openfire XMPP server.
Tags:
How to install Openfire and integrate it with Asterisk PBX server
How integrate Openfire with Asterisk
Asterisk running on CentOS 7 server and Openfire on CentOS 7 server integration.
How to make Softphones;X-Lite and Zoiper chat using Openfire XMPP server.
Prerequisites
- Installed Asterisk PBX server
- Installed Openfire XMPP server
- Asterisk and Openfire networked so that both can communicate successfully.
- Basic knowledge of Linux and files editing
- Compiled res_xmpp.so and res_jabber.so Asterisk modules.
Installation of Openfire XMPP Chat Server:
Complete guide on how Install Openfire XMPP chat server on Centos 7
Installation of Asterisk PBX:
How to install Asterisk PBX 13.x on CentOS 7 step by step guide
We'll follow steps below to complete the integration.
> Once you've installed both Asterisk and Openfire, start Openfire and login to Web configuration interface. Use ip 127.0.0.1 if you have Openfire installed on your host computer and ip address of Openfire server if it's on a remote system or on a Virtual Machine.
![]() > Login with the username and password you configured during installation.
> Login with the username and password you configured during installation.
> On the Menu section, go to Plugins >> "Available Plugins"and Search for plugins named "Asterisk-IM"and "SIP Phone Plugin". Install the Plugins by clicking on the + (Plus sign) at the right corner of the plugin name section.
> If you can't seem to find above plugins under "Available Plugins" sub-menu, you may download the plugins manually and put them inside "Openfire plugins directory".
Do the following on Openfire XMPP server.
> Once you've installed both Asterisk and Openfire, start Openfire and login to Web configuration interface. Use ip 127.0.0.1 if you have Openfire installed on your host computer and ip address of Openfire server if it's on a remote system or on a Virtual Machine.
http://127.0.0.1:9090
http://your_ip_address:9090

> On the Menu section, go to Plugins >> "Available Plugins"and Search for plugins named "Asterisk-IM"and "SIP Phone Plugin". Install the Plugins by clicking on the + (Plus sign) at the right corner of the plugin name section.
> If you can't seem to find above plugins under "Available Plugins" sub-menu, you may download the plugins manually and put them inside "Openfire plugins directory".
Do the following on Openfire XMPP server.
su -
Type your root password, then
cd /opt/openfire/plugins/For Openfire to recognize added plugins, restart it using command below
wget http://www.igniterealtime.org/projects/openfire/plugins/sip.jar
wget http://suse.mes.edu.cu/Utiles/Jabber/Openfire-3.8.x/Plugins/2013/asterisk-im.jar
service openfire restart> Once you restart Openfire, you should see Asterisk-IM menu apper on openfire dashboard's menu. Click on it to configure it.
> Under Asterisk-IM > General settings, make sure Asteris-IM plugin is enabled.
On "Configure Phone Manager", add Asterisk Context, mine is named test.If you have context already configured in your Asterisk Server, add it here. In case you don't have any context, use "test" as we'll add it later.

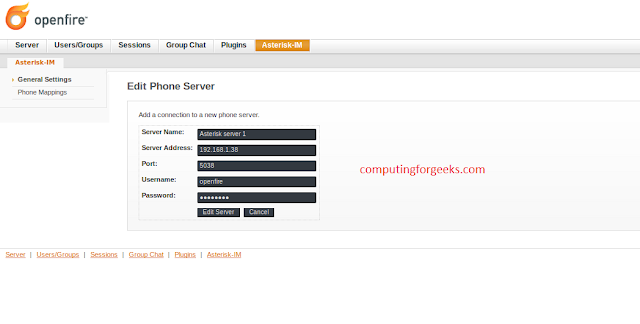
> Now it's time to add Asterisk Server. This is done by just clicking on "Add Server" option under General settings.Then provide the following information
Server Name:Alias name of your Asterisk Server. Can be any name
Server IP: Ip address of your Asterisk Server
Port: connection port used to connect to Asterisk Server, default is 5038
Username: user name that will connect to the asterisk manager. We'll add it to Asterisk manager.conf file in the next step.Save the configurations.
Password: user password that will be used to connect to Asterisk PBX server.
See screenshot below for my configuration.
> Head over to Asterisk Server and add the user you specified on previous step to /etc/asterisk/manager.conf file.
Start your Asterisk PBX server, then
![]()
Add the user that will connect to Asterisk Server, go to users and Groups then add user.
Username: openfire
Name: openfire
Password: openfire
![]()
Restart Asterisk.
![]()
_XXX: It is a pattern matching meaning any extension with three digits.
${EXTEN} is a variable holding extension number dialed.
> Add SIP users to be mapped to XMPP chat accounts.
![]()
> Let's now go back to Openfire and add users to map to the SIP accounts we've added.You'll configure:
Username: Your username
Name: Your Full name
Email: Your email address
![]()
> Under Asterisk-IM >> Phone Mappings >> Add User/Asterisk Phone mapping, specify:
![]()
Save settingsand you have successfully completed the configurations.
> Before we can start sending messages to our XMPP buddies, we need to connect to an XMPP-enabled server. Add following configurations to xmpp.conf file.
For Ubuntu and Debian based systems:
> Installing res_xmpp
Once you’ve installed the dependencies, you need to run ./configure in your Asterisk source and make menuselect. Then go into the Resource Modules menu and make sure res_xmpp is enabled. After that, run make install to get the new modules.
Start your Asterisk PBX server, then
su -or
nano /etc/asterisk/manager.conf
vi /etc/asterisk/manager.confMake sure the general section has the following configuration options.
[general]Add the user you specified on step 5 and the password.
enabled = yes
webenabled = yes
port = 5038; This is the Asterisk AMI Port number
httptimeout = 120
bindaddr = 0.0.0.0
allowmultiplelogin = yes
displayconnects = yes
timestampevents = yes
[openfire]
secret =password-that-you'll-set-on-next-step
displayconnects = yes
read = system, call, log, verbose, agent, user, config, DTMF,reporting
write = system, call, agent, user, config, comman, reporting

Add the user that will connect to Asterisk Server, go to users and Groups then add user.
Username: openfire
Name: openfire
Password: openfire

Restart Asterisk.
service asterisk restartor
/etc/init.d/asterisk reload> Let's create the context "test"on Asterisk.
vi /etc/asterisk/extensions.confGo to the end of the file and add the following lines.
[test]
exten => _XXX,1,Answer
exten => _XXX,n,No0p ( This-is-a-sample-context)
exten => _XXX,n,Dial(SIP/${EXTEN},10,r)
exten => _XXX,n,Hangup

_XXX: It is a pattern matching meaning any extension with three digits.
${EXTEN} is a variable holding extension number dialed.
> Add SIP users to be mapped to XMPP chat accounts.
vi /etc/asterisk/sip.confOn general section add the line:
callevents = yesThen add the following Lines at the end of the file.
[101] ; Account name
context=test ; default context for incoming calls
type=friend ;Access type
secret=password ; a secure password for this device
usernam=kim
nat=no ;Disabled NAT for LAN
bindport=5060 ; UDP port for Asterisk
disallow=all ;Disallow all Call Codecs
allow=ulaw
language=en
host=dynamic ;use DHCP to get ip address
qualify=yes
allowguest=no ; disable unauthenticated calls
dtmfmode=auto ; accept touch-tones from the devices, negotiated automatically
[102] ; Account name
context=test ; default context for incoming calls
type=friend ; Access type
secret=password ; a secure password for this device
username=val
nat=no ;Disabled NAT for LAN
bindport=5060 ; UDP port for Asterisk
disallow=all ;Disallow all Call Codecs
allow= ulaw
language=en
host=dynamic ; use DHCP to get ip address
qualify=yes
allowguest=no ; disable unauthenticated calls
dtmfmode=auto ; accept touch-tones from the devices, negotiated automatically

> Let's now go back to Openfire and add users to map to the SIP accounts we've added.You'll configure:
Username: Your username
Name: Your Full name
Email: Your email address

> Under Asterisk-IM >> Phone Mappings >> Add User/Asterisk Phone mapping, specify:
- * Username: jose
- * Device: SIP/101
- * Extension: 101
- Caller ID: jose
- Primary: yes

Save settingsand you have successfully completed the configurations.
> Before we can start sending messages to our XMPP buddies, we need to connect to an XMPP-enabled server. Add following configurations to xmpp.conf file.
vi /etc/asterisk/xmpp.confAdd:
[asterisk]> To install res_xmpp, we need the iksemel development library. If the OpenSSL development library is installed, res_xmpp will also utilize that for secure connections.First install iksemel and OpenSSL Libraries.
type=client
serverhost=192.168.1.105 ; ip addresss of XMPP server(Openfire)
username=openfire@192.168.1.105
secret=openfire
priority=1
usetls=yes
port=5222
usesasl=yes
status=available
statusmessage="Asterisk Server"
endtodialplan=yes
context=from_xmpp
keepalive=yes
For Ubuntu and Debian based systems:
sudo apt-get install libiksemel-dev libssl-devFor CentOS 7 and RedHat Bases systems:
sudo yum install iksemel-devel openssl-develRestart your Asterisk Server then install res_xmpp as below.
> Installing res_xmpp
Once you’ve installed the dependencies, you need to run ./configure in your Asterisk source and make menuselect. Then go into the Resource Modules menu and make sure res_xmpp is enabled. After that, run make install to get the new modules.
cd asterisk-source-directory
./configure
make menuselect
## Then go into the Resource Modules menu and make sure res_xmpp is enabled.
make install
Testing.
- Test to confirm that sip users were successfully added to asterisk
service asterisk restart
asterisk -rvvvvvv
sip show peers

- Test to confirm that Asterisk and Openfire XMPP server are communicating, on Asterisk CLI type:
manager reload
manager show connected

You can now install Sparkweb which is an Open Source, web-based IM client optimized for businesses and organizations and Spark IM client to use. You will be able to receive a call via SIP account we added to Asterisk.
On our next tutorial, we'll talk about how to Use Zoiper and X-Lite Softphones to send instant messages over Openfire XMPP server.
Tags:
How to install Openfire and integrate it with Asterisk PBX server
How integrate Openfire with Asterisk
Asterisk running on CentOS 7 server and Openfire on CentOS 7 server integration.
How to make Softphones;X-Lite and Zoiper chat using Openfire XMPP server.